Adding keyboard shortcuts
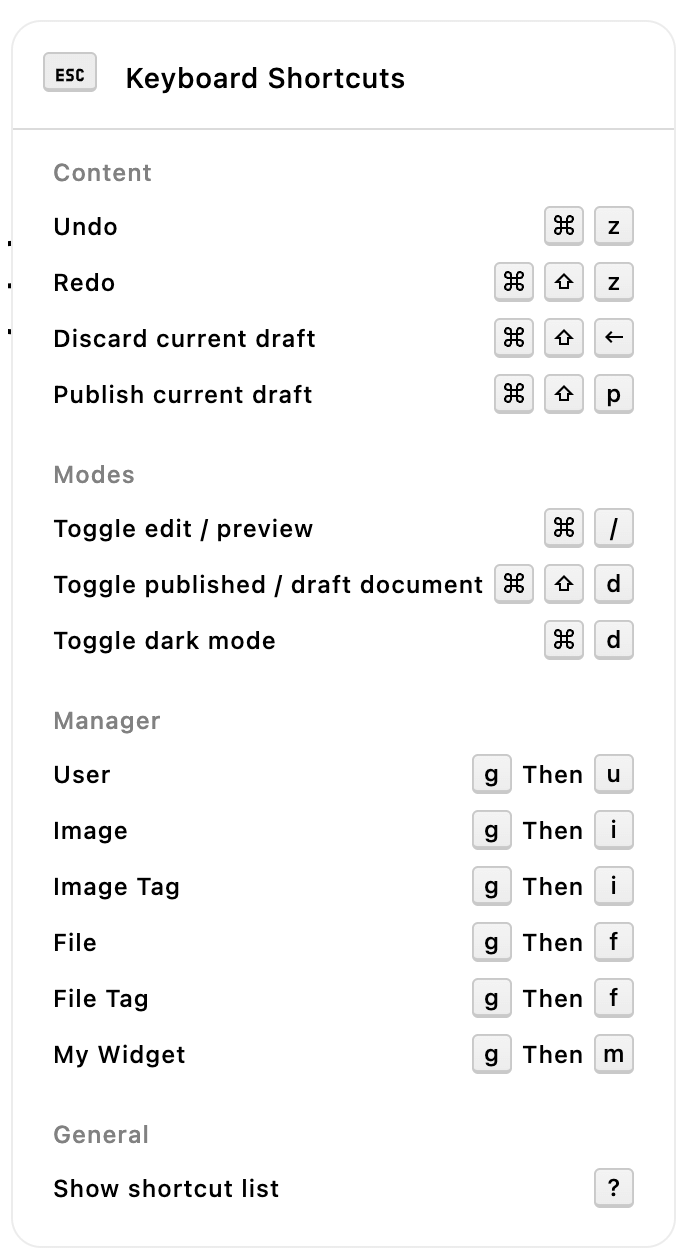
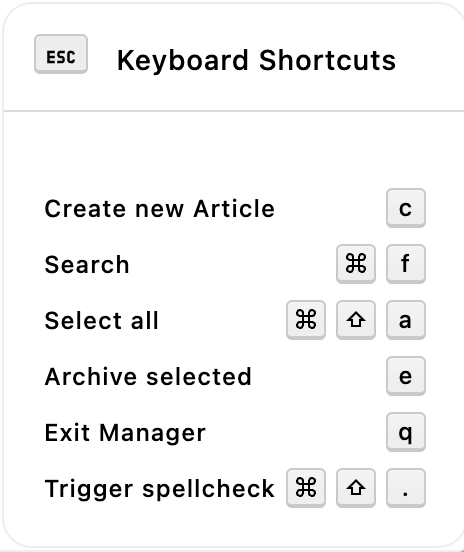
The @apostrophecms/command-menu module adds keyboard shortcuts and additional pop-up menus to the Admin UI. The list of shortcuts can be accessed from any page or piece-type manager using the '?' key. There are several pre-programmed common shortcuts, with additional page-level shortcuts added automatically for each custom piece-type created.
Reassigning automatic shortcuts
Apostrophe assigns shortcuts for custom piece-types based on the first letter of the piece-type name. So, a piece-type of 'article' would get assigned a shortcut cord of g then a. However, you might have more than one module that starts with a particular letter, or starts with the same letter as a core piece-type. The automatically assigned shortcut can be changed by adding an array of the desired shortcut key combination(s) to the shortcut option in the module. You can disable a shortcut by setting the option shortcut: false.
module.exports = {
  extend: '@apostrophecms/piece-type',
  options: {
    shortcut: 'g,z',
    // the remainder of the options
  }
};There are three options - a single key, a key plus one or more modifiers, or a chord of two sequential key presses. You can pass multiple shortcuts by separating each with a space. This is important when passing in shortcuts that use a modifier key that differs between Macintosh and Windows/Linux keymapping. W3C has published helpful guidance in selecting new shortcut keys. Keep in mind any existing shortcuts for MacOS, Windows 10 & 11, and Ubuntu.
For a single key, just pass that key as the string value to shortcut. The 'comma', 'space', and modifier keys (see below) shouldn't be used, but every other standard key can. See the table for additional keymappings for keys like the left arrow.
The modifiers that you can use are the 'command', 'option', 'alt', 'control', 'win', 'meta', and 'shift' keys. You can specify that one or more of these keys are held down at the same time as pressing a non-modifier key to activate the shortcut, for example, Cmd+Shift+m. See the table for the modifier keymappings.
Finally, you can assign a chord of two sequential keypresses to any shortcut by passing a string with each key separated by a comma. Remember that a space can be used as a key, so don't add a space after the comma.
❌ shortcut: 'x, y'
✅ shortcut: 'x,y'
INFO
Shortcuts already defined by the browser cannot be used within the shortcut manager.
Adding custom shortcuts
Any module can streamline the editorial workflow through the addition of custom shortcuts. These shortcuts are added to the commands(self) customization function section of the module's index.js file. Like the other customization functions, it should return an object.
module.exports = {
  // ...
  commands(self) {
    return {
    //...
    }
  }
}Registering shortcut commands
New shortcuts are registered by passing them as an object of objects to the add key. Each shortcut object requires a unique name as key. The best practice for ensuring the uniqueness of your shortcut name is to namespace it with the module name, for example, custom-widget:shortcut-name. If you are registering a shortcut in a base class that is extended by several modules, it may be programmatically easier to prefix with the registered name by using [`${self.__meta.name}:shortcut-name`]. Note the use of brackets and backticks to allow the use of template literals and to dynamically set our object key.
module.exports = {
  // ...
  commands(self) {
    return {
      add: {
        'custom-widget:new-shortcut': {
          type: 'item',
          label: 'New shortcut',
          action: {
            type: 'custom-widget-special-action',
            payload: {
              name: 'CustomWidgetActionShortcut'
              props: {moduleName: 'custom-widget'}
            }
          },
          shortcut: 'Ctrl+Shift+P Meta+Shift+P'
        }
      },
      // ...
    }
  }
}Each shortcut object takes four required properties.
The type key always takes a value of item.
The second, label, takes a string to display within the menu next to the shortcut keys.
The action key takes an object with one required and one optional property. The type key is required and takes a string. This string will be emitted when the user completes the shortcut. This string can be detected and used to trigger a function using apos.bus.$on('type-string', function). This can be added to the mounted() hook of your Vue component or in custom module JavaScript added to the /modules/custom-widget/ui/apos/apps/custom.js file. If used in a Vue component it is best practice to also remove the listener by adding apos.bus.$off('type-string', function) to the destroyed() hook. If this string is specific to this module it must be unique, but the string can also be shared by multiple modules to trigger changes. For example, many built-in piece-types like the @apostrophecms/image and @apostrophecms/file use a common string of command-menu-manager-close to trigger the closing of the manager modal.
The optional payload key takes an object with properties that will be passed to the event listener. In the above example, you would use:
// ...
async mounted() {
    apos.bus.$on('type-string', async state => {
      await self.function( state.name, state.props)
    });
  },
  destroyed() {
     apos.bus.$off('type-string', async state => {
      await self.function( state.name, state.props)
    });
  },
// ...The final key required by the shortcut object is shortcut. This is set identically to the top-level shortcut option that is used to reassign automatically added shortcuts.
Keymappings
Not that the key mappings below are shown with initial capitalization, but are case-insensitive.
| key(s) | Mapping |
|---|---|
| a-z, 0-9,`-=[];'./ | The same as the specific key (note that any upper case or symbol key that requires that the shift key be pressed will not work) |
| function keys 1-12 | fn1 - fn12 |
MacOS Command or WinOS Win key | Meta |
Command | Cmd, Command |
Option/Alt | Alt, Option |
Control | Ctrl, Control |
Escape | Esc, Escape |
Space | Space |
Tab | Tab |
Shift | Shift |
Caps lock | Capslock |
| arrows | arrowleft, arrowup, arrowright, arrowdown |
MacOS Delete or WinOS/Linux Backspace | Backspace |
WinOS/Linux Del | Delete |
pgdn | Pagedown |
pgup | Pageup |
Organizing shortcut commands
There are two types of shortcut menus. One is displayed on all page types, while the other is specific for each piece-type. Where each newly registered shortcut is displayed is determined by the modal property of the commands(self) function.
Adding shortcuts to the page-level menu
The addition of shortcuts to the main page-level menu is accomplished by passing an object of objects to the default key. This key takes properties that specify either one of the four existing section ("content", "mode", "manager", or "general") or specifies the creation of a new section.
Each of the keys in the default object should start with @apostrophecms/command-menu: and be prefixed with the name of an existing or new section. For example, to add a new shortcut to the "general" section the key would be @apostrophecms/command-menu:general. For values, each key takes an object with a commands and an optional label property. The value of commands should be an array containing the names of all the shortcuts to be added to the section. The label key should be set to a string that will be added as a menu section header.
INFO
If you add a label property to a key that specifies an existing section, the passed-in lable string will override the existing label.
module.exports = {
  // ...
    commands(self) {
    return {
      add: {
        'custom-widget:dark-toggle': {
          type: 'item',
          label: 'Toggle dark mode',
          action: {
            type: 'toggle-component-to-dark-mode'
          },
          shortcut: 'Meta+d'
        }
      },
      modal: {
        default: {
          '@apostrophecms/command-menu:mode': {
            commands: [ 'my-widget:dark-toggle' ]
          }
        }
      }
    };
  }
};
Adding shortcuts to the piece-type menu
Shortcuts can be added to the piece-type menu by specifying the particular module with a key made up of the module name followed by :manager. For example, my-piece:manager. This key gets a property of @apostrophecms/command-menu:manager that has an object composed of commands and optional label properties. Like the page menu, the commands key receives an array composed of the names of each shortcut to be added.
module.exports = {
  / ...
  commands(self) {
    return {
      add: {
        'article:spellcheck': {
          type: 'item',
          label: 'Trigger spellcheck',
          action: {
            type: 'trigger-spellcheck-of-article',
            payload: {
              language: 'en'
            }
          },
          shortcut: 'Cmd+Shift+.'
        }
      },
      modal: {
        'article:manager': {
          '@apostrophecms/command-menu:manager': {
            commands: [ 'article:spellcheck' ]
          }
        }
      }
    };
  }
};
In this case, we could add our listener into some custom JavaScript that powers our hypothetical spell checker.
export default () => {
  apos.bus.$on('trigger-spellcheck-of-article', (payload) => {
    console.log('Spellcheck triggered with language ', payload.language);
    // remainder of the spellcheck code
  });
};